Monday, December 28, 2015

Cylinder Magnets used in Art Exhibition

Cylinder Magnets used in Art Exhibition
Our customer Jem Magbanua, who is an artist, was kind enough to send us this photo of how she used cylinder neodymium magnets to display her drawing in “The Days That We Wonder” exhibition at Deck Gallery.
Magnets hold up artworks and drawings without damaging the exhibits and doesn’t requires drilling of holes that damages walls and it is a clean alternative that doesn’t leave hard to clean, sticky residues that is common when using double sided tape or foam adhesives.

Magnetic Quick Release on Back Pack

Magnetic Quick Release on Back Pack
Carrying a water bottle on the side pouch of a backpack allows easy access for a quench of thirst without having to remove or put down the backpack. But our customer HC Ong pointed out that his water bottle often got flunk out of his backpack whenever he is in a hurry or during a quick turn that causes the backpack to swerve. It is an annoying problem that can cause a dent on a nice looking aluminium water bottle or causing slight breakage to plastics ones. Worse still, some water bottle were simply lost.
He found the perfect solution by attaching a cord from his backpack to one side of magnetic quick release and attaching the other side of the magnetic quick release to his backpack side pouch.
This allows him to run the cord thru a hole on his water bottle and secure it with the magnetic quick release. This keeps his water bottle in place even when he runs or swing his backpack. To remove water bottle, a quick tug on the cord separates the magnetic quick release. The best part is how easy it is to secure the magnetic clasp single handedly, simply bring one side close (appx 1.5cm) to the other half and it automatically snap in place by the sheer magnetic force!
Try doing that with a typical 2 pronged plastic clip where you have to align and insert one side to the other and push it in, with just 1 hand.

Magnetic Quick Release Secure Water Bottle

Fix Broken Air-conditioner Cover with Magnets


Fix broken air-conditioner cover with magnets.
BrokenAirconCover
I’ve seen it numerous times, missing air-conditioner cover, cover duct taped to to the blower unit, using a twisted wire to hold the cover in place, slanted ill fitting air-conditioner covers (no repair attempted, just hanging there with the remaining hinge)…
These are tell tale signs that the hinge or latch of the covering is broken and most owners results to creative ways of repairs, relatively better than not covering it at all which can affect the air-flow and dust protection of the blower unit.
Below is just an alternative way of repair/modification to add to the list : ), except that:
1) there are no tell tale sign once we’re done
2) it works better than the original cover, you’ll realise it on your next cleaning (but don’t start breaking your cover yet if it’s still under warranty!)
So let’s get started!
Fix broken aircon cover with magnets
What you’ll need:
– The air conditioner cover with broken hinge (go on and break off the remaining plastic hinge since if it’s already broken)
Block neodymium magnets 20 x 10 x 2 mm: 1-2pcs  (if you are not using a scrap metal)
– Super glue
– Double sided adhesive tape
– Good quality adhesive tape
– Small piece of scrape metal (optional, if you are using just 1 magnet)
Step 1. Identify a spot on the air-conditioner blower unit that has contact with the cover or has just a small gap (2-4mm gap is fine) from the cover when fully closed.
Mark the spot on to the cover. (ideally it is a flat smooth area)
Step 2. Stick the scrap metal Or 1pcs of the magnet to the cover using double side adhesive tape (If you are using magnet, take note of the polarity so you will not end up sticking both the same polarity facing each other)
Reinforce by pasting a big generous piece of adhesive tape over the magnet/scrap metal
StickMetalToCover
Step 3 Super glue a piece of block neodymium magnet to the spot on the air-conditioner unit where it will come in contact with the cover when fully closed.
Apply firm pressure on the magnet for 10 seconds for the super glue to bond.
Reinforce it by wrapping some adhesive tape over the magnet, I’ve added 2 layers of clear adhesive (vertically and horizontally) for good measure. Apply pressure and give the adhesive tape a good rub to secure it in place. If you are not in a hurry, wait for a few hours for the super glue and adhesive tape to set and have a good grip because we want this to be really secure.
Stick Magnet To Aircon
This photo highlight in red the single block magnet positioned on the top-middle section of the air-conditioner.
The 2 blue circles shows original holes for existing latches which requires no modification.
Magnet on Aircon
Step 4. Align the magnets/scrap metal piece and fix the cover back to the air-conditioner blower unit, it should click when in contact. (Shown in red circle below)
Finally, press in the latchs to secure the cover and we are done!  (Shown in blue circles below)
Fix Aircon cover with magnets

The following photo taken from way up the ceiling shows the gap between the cover and blower unit.
The neodymium magnet holding on to the cover scrap metal can be seen only through the grill above if you climb up and look really hard.
Untitled-14
As a bonus, you can now easily remove the whole cover for washing during cleaning and maintenance without the fear of breaking a plastic hinge!
There are simply no more hinges to break.
Notes:
The reasons why a scrap metal was used in this case is because:
1) Some cover are relatively light weight, not necessary to use 2pcs of neodymium magnets
2) Scap metal which are thin and larger size than the magnet is easier to stick to the cover as it has a larger surface area for more double side adhesive hence better adhesion.
3) No need to align 2 pieces of magnets perfectly as the scrap metal is slightly larger.
But for other cases, you may need the strength of 2pcs of neodymium magnets if the cover is heavy or the gap is wider. Some situations may require a disc shaped neodymium magnets, it really depends.
Happy modifying!

Mounting Magnets - pot countersunk neodymium magnets hooks

Mounting Magnets

Mounting Magnets – What are they?

An MMS-E-X8 stuck to a steel I-beam
Mounting Magnets are strong neodymium magnets that are set inside a steel cup or channel.  Most come in round shapes, but we also offer a few Rectangular Mounting Magnets.

They include countersunk holes or threaded features that allow for mounting with standard hardware (nuts and bolts), as well as various hooks.

They are intended to attract to a steel (or other ferromagnetic) surface.

Why would I want to use a Mounting Magnet instead of a plain disc or ring magnet?

Magnetic field of a disc magnet compared to a Mounting Magnet.  Magnet shown in green.
1. More Magnetic Strength.  A Mounting Magnet offers much more strength than you get with the magnet alone.  If you took the magnet out of a Mounting Magnet, you might only see half the pull force that you had fully assembled.  In terms of dollars spent per pound of pull force, they can be a better value than a plain magnet.

Why is it stronger?  Their construction consists of a disc or ring magnet sitting inside a steel cup.  With a plain disc magnet sticking to a steel surface, the magnetic field looks as shown in the top part of the magnetic field picture at left.  You get a strong attraction where the magnet touches the steel, but the magnetic field on the opposite side of the magnet isn't doing much to provide pull force.

With the steel cup of a mounting magnet, the steel structure redirects the magnetic field from the back-side of the magnet, turning it into more useful holding strength.  A Mounting Magnet gets a lot of its strength by the steel cup attracting to the surface, because the steel cup is magnetized by the magnet.  In the magnetic field picture, the steel cup looks purple on the color scale because the steel is magnetically saturated -- as full of magnetic flux as it can get.

You could say that the Mounting Magnet is stronger because the magnetized steel makes the assembly act like a bigger magnet.  Also, you get a lot of strength by having those poles close to one another, which provides a strong magnetic flux in the steel surface it sticks to.
2. DurabilityNeodymium magnets are made of a hard, brittle material.  If you let them slam into one another or into a steel surface, they can chip or break.

Our Mounting Magnets are constructed so that the surface of the magnet is set very slightly below the surface of the steel cup.  When it hits a steel surface, the steel cup takes the brunt of most impacts.
3. Mounting Options.  Our Mounting Magnets come in a variety of mounting options.  This includes a number of options that include threaded steel features (with male or female threads) that you can attach using standard hardware.

Neodymium magnet material is so hard and brittle that you can’t make usable threads with it.  We've tried in the past, but the threads shear as soon as torque is applied on a screw or bolt.  It is like trying to make usable threads in ceramic.  By providing threads in a steel part, you get a sturdy mounting solution not possible with plain magnets.

Mounting Magnets are available in both metric and standard/American/Unified sizes, millimeters or inches.  Styles include:
  • Countersunk, MM-A and MMS-A
  • Counterbored, MM-B and MMS-B
  • Male threaded stud, MM-C and MMS-C
  • Female threaded stud, MM-D and MMS-D
  • Female threaded stud with steel hook, MM-E and MMS-E
  • Female threaded stud with eye-hook, MMS-G only
  • A low-profile inset thread, MMS-H
There are also a number of Rectangular Mounting Magnets available, with countersunk holes.

How strong are Mounting Magnets?

Each of our Mounting Magnets product pages includes a listed Pull Force number, expressed in pounds.  This is the force required to pull one of these magnets straight away from a steel surface.  Strengths range from just a few pounds, as with the tiny MM-C-10, to several hundred pounds from big 3” diameter magnets like the MMS-A-Z0.
Note: When loading the magnets in a different orientation, expect different results.  Stuck to a vertical surface like a wall, a mounting magnet won’t necessarily hold up a weight that’s equal to the listed pull force number.  In fact, it is usually lower.  How much it will hold depends on the friction between the surfaces, the shape of what is being held up, and a few other factors.  See How Much Will a Magnet Hold?
The magnets with hooks on them are especially worth mentioning in this regard.  When you hang a weight vertically on one of these hooks, the maximum load is less than the listed pull force.  The long hook provides some leverage that makes the magnet easier to pry off when loaded this way.

Fishing for Lost Objects

Mounting Magnets are great for trying to retrieve objects that are lost underwater.  They are often used to fish up magnetic objects lost on the bottoms of lakes and rivers.  If there is a large steel component to the item, it can be possible to lift with these magnets.
Our MMS-G magnets are popular for this, with their eye-hook that's convenient for attaching a rope or cable.  Some of our customers have reported good results using an MMS-C and MMS-D magnet screwed together, with the rope/cable/cord tied on the space between them.  The idea is that this combination might be more likely to catch onto an object below the water’s surface.
At right, the MM-C-48 and MM-D-48 magnets are shown attached to one another, with the rope tied between them.  At far right, a single MMS-G-Y0 hangs from a rope.

What are Mounting Magnets Not Good For?

Magnet-to-Magnet attraction. These magnets are not made for attracting to each other.  In fact, they won’t.  All of our Mounting Magnets are assembled with the north pole of the magnet facing out.  If you try to line them up with one another, they will repel.  They will stick together with an offset, as shown.
We make them this way for consistency and to make them easier to package together.  Sorry, we are not able to offer these magnets with the south pole facing out.
Mounting Magnets are not waterproof.  If used outdoors, consider some means of protecting them from moisture.  Without protection, these magnets can rust over time.  A solution can be as simple as a coat of paint.  Our Plastic Coated Magnets are a good off-the-shelf solution when protection from water is important.
On a scratchable surface.  If used on a painted surface, consider MM-RC rubber covers, which are available for many of our metric mounting magnet sizes.  These covers were featured in our recent article on Vehicle Signs, where we mounted a big sign on the painted roof of a car.
Reaching Across a Distance.  Warning: Technical Content.
The magnet inside a steel cup construction of a Mounting Magnet offers more strength than a single magnet does when sticking to a steel surface.  If there is a significant gap between the Mounting Magnet and the steel surface it sticks to, however, the benefits of the steel cup diminish.
The graph of Pull Force vs. Distance below helps to illustrate the idea.  It compares a 1-1/4" diameter MMS-C-X4 magnet to a number of disc magnets: the 1" diameter DX04, the 1-1/4" DX44 and the 1-1/2" DX88.
At a distance of zero, where the magnet is touching the steel surface, the Mounting Magnet has much more strength than the similarly sized disc magnets, over double their pull force!  If there is a gap of 1/4" or more, however, it isn't much stronger at all.
The graph also compares the Mounting Magnet to a larger, 1-1/2" diameter x 1/2" thick DX88 disc magnet.  This is a bigger magnet that is more expensive than the MMS-C-X4 mounting magnet.  The pull forces when touching a steel surface are very similar, but when there is a large gap, the big disc magnet has the advantage.
You can still use mounting magnets with a small gap between the magnet and the steel surface they are attracting to, but be aware of how the strength will decrease with gaps or a layer of non-magnetic material between the magnet and the steel surface.
Pull Force vs. Distance, where distance is from the magnet to a steel surface

Videos?

While we haven't included any videos of these powerful magnets in action, we do have a few posted online.  You can find them on a few of the individual product pages, hidden under the "Video" tab.  Click to these product pages to find them:
  • MMS-E-X0
  • MMS-E-X4
  • MMS-E-Y0
  • MMS-E-Y8
  • MMS-E-Z0

Be careful – they’re strong!

As always, be careful when handling strong neodymium magnets.  Handle these magnets with care, especially the larger ones.  You don’t want to pinch your finger between magnets that can exert hundreds of pounds of force!

Neodymium Magnets Allications in Vehicle Signs & Ads

Vehicle Signs

The sign slides backwards.
The sign rotates off the roof.
Strong neodymium magnets are often used to attach signs or light-bars to the roof of a car or truck.  What magnets should be used?  What magnets will be strong enough?

Disclaimers

A magnetic attachment to the roof of your vehicle can be a very handy solution.  It makes lights or signs easy to install and remove.  It doesn’t alter the vehicle.  However, it is not nearly as secure as a mechanical clamping or screw-on attachment.  The dangers of having a sign, light-bar or other object detaching from the vehicle while driving are very serious.  Please be mindful of these dangers.
This article describes some of the ways an engineer might think about this problem, and shows some actual testing we conducted.  It is not a specific recommendation for how to do this with your sign, or a recommendation of a particular magnet size as being strong enough for your application.
If in doubt, don’t try this at home.

Really, please be careful!

If you use magnets to hold something to the roof of our vehicle, it could pose a very real danger if it comes loose.  If it flies back into the windshield of the car behind you, serious damage or injury could occur.  Please take these warnings very seriously.  Consider an appropriate factor of safety, over-specifying the strength in your application.

The goal: Stick a sign on the roof of a car with magnets

We’ve heard of many different types of things secured to the roof of a car using magnets.  Examples include light-bars (the flashing lights used by police, fire and ambulance), taxi signs, and artistic works, including two pieces of bread on top of a “toaster car!”
The goal for all of these projects is the same: Choose magnets that are strong enough to hold the sign securely in place during all expected driving conditions.  For the example considered here, we constructed a forward facing sign made of wood, sized 2 feet wide by 1 foot tall.  Since the wind force on any sign is largely a function of the forward facing surface area, this is a fair representative sample.

A magnetic sign fails in one of two ways

We examine two failure modes: Sliding and Rotating.
Sliding occurs when the force of the wind overcomes the friction force between the magnets and the roof.  The sign slides backward along the roof the vehicle.
Rotating occurs when the height of the sign gives the wind force enough leverage to “pry” the sign off the car, usually lifting the front magnets off the surface and sending the sign tumbling.
Because of this rotational failure mode, multiple magnets must be used with the magnets spaced fore and aft of the load/wind direction.  As shown at right, the “BAD” sign fails easily, tipped over by the wind.  The “GOOD” sign fares better, since the magnets have some leverage to fight this rotating tendency.
In practice, failures are often a combination of the two.  As the force tries to rotate the sign, the front magnets are pulled away from the car.  This tends to reduce their friction force contribution.

Gather experimental data for a number of magnets

To design a sign properly, we need some good data on how well these magnets will hold to the top of our car.  Most of our magnets have listed Pull Force values, but these are tested by pulling the magnet straight away from a big, thick, unpainted steel plate.  Performance on the roof of a car will be different because the surface is not thick, is painted, and isn't perfectly flat.
The data below catalogs some experimental data we gathered on the roof of our test-car:
P/N Listed Pull Force (lb) Pull Force, lifting straight up, off the roof of car (lb) Shear Force, pushing magnet sideways/horizontally on roof of car (lb)
MM-E-32 with MM-RC-32 75 6.6 7.4
MM-E-36 with MM-RC-36 90.4 9.4 8.2
MM-E-42 with MM-RC-42 149.9 12 8.2
MM-E-48 with MM-RC-48 178.6 13 8.8
MM-E-60 with MM-RC-60 249.1 18 17
MM-E-75 with MM-RC-75 361.6 25 18

Why are the listed pull force values listed on our product pages so much higher than what we tested on the car?  There are several reasons.  The thickness of the rubber cover reduces magnetic pull force by as much as 75%, since the magnet is farther away from the steel surface.  Also, the thin steel surface of the roof isn’t as thick as the test plate we use for testing, so the force is further reduced.
While experimenting with these measurements, we noticed a lot of variation.  For example, if the magnet is stuck to a portion of the roof where an internal support structure lies, you can see greater forces than in an area where there isn’t a support.

Use some static analysis to calculate expected performance

Warning: Math Content.  You can skip this section about the theory and jump straight to our testing.
Theoretical force on our 2 sq. ft. sign at various windspeeds
This section explains how to analyze the two failure modes.  It simplifies the problem by looking at them as completely separate situations, which isn’t technically correct.  It also ignores a number of other important factors you should be thinking about which will be mentioned later.
What is the force on the sign from the wind?
The force from the wind on a given sign will depend on the actual wind speed, the shape of the sign, the aerodynamics of the car, etc.  To get a rough estimate, we simplify the problem and use a formula for drag force on a flat plate:
Where = density of air (1.2 kg/m3), v = the airspeed (m/s), = the drag coefficient of 1.28, and A = the area of the flat plate (m2).  Using these units gives the force in Newtons; multiply by 0.225 to get pounds of force.
For the 2’ x 1’ sign in this example, the graph at right shows the theoretical force as a function of the wind-speed.  Note that the force goes up as the square of the velocity: A sign traveling at 60mph feels 4 times the force of a sign traveling at 30 mph.  That's the difference between 6 lb and 24 lb!
We built a sign that uses four magnets, separated by 1 foot fore-and-aft on the vehicle.  This long magnet-to-magnet distance helps resist the tendency of the sign to rotate backwards in the wind.
For details, see this PDF of hand calculations, including numbers for a few sample magnets.  Note that all of these calculations ignore many important, real-world problems, including:
  • How the combination of these failure modes affect one another
  • There is NO factor of safety included, which real applications should use
  • It ignores any specification of what the expected maximum wind speed should be, including wind gusts, swirls or vortices from other vehicles, etc.
  • It ignores any impact of bumps in the road or vibration induced loads
  • It ignores any treatment of lateral wind forces, from the side of the vehicle

Let’s test it on an actual car

We constructed a 2’ x 1’ sign out of wood.  We attached four MM-A-42 magnets with MM-RC-42 covers, spaced 12” apart fore-and-aft.  According to the theoretical calculations above, we might predict that this setup to fail by sliding at a wind force of 33 lb, at about 71 mph.
Before driving anywhere, we can test it by measuring the push force required to move the sign on the vehicle.  When we initially placed the sign on our vehicle, we measured a push force of 37 lb, a little more than predicted.
After we drove around for a while, we tested the push force again and recorded 55 lb.  We suspect this greater force might have been related to better friction from the rubber covers after they were warmed in the sun.
Finally, the best test is to drive the vehicle at speed.  The video below shows our testing up to 70 mph, with no movement of the sign.  We used some blue safety ropes to secure it to a roof rack for our testing, which you'll see flapping in the breeze.  This was a simple way to make the test safer and avoid damaging our car.

We also tested a few other magnets, including plastic coated magnets like our BY0X08DCSPC-BLK.  While this is a great, strong, waterproof magnet, there’s less friction between the surfaces.  This gave us a sliding failure, as shown in this video.

Analysis of Results

The limited testing we conducted validates this way of analyzing magnetic signs.  It’s a rough model, with lots of variation to be expected in the real world.
We recommend using stronger magnets than the MM-A-42 magnets used in our example.  The exact number and size of magnets you use depends on the size of your sign and the expected operating conditions (wind speed).
We’ve heard a number success stories using MM-A-48 or MM-A-60 sized magnets.  In each case, a long “fore-aft” distance between magnets was used to overcome the tendency of the sign to rotate off the vehicle.

Also consider rubber coated magnets

Another good solution might be our rubber coated magnets.  If the bottom of your sign is made of steel, you could simply place the magnet between the steel bottom of the sign and the roof of the vehicle.
Here are some measured experimental values for rubber coated magnets we tested on the roof of our vehicle:
P/N Listed Pull Force (lb) Pull Force, lifting straight up, off the roof of car (lb) Shear Force, pushing magnet sideways/horizontally on roof of car (lb)
DC6BR-N52 15.73 6.8 7.2
DX08BR-N52 32.6 9.6 6.8
BX084BR-N52 12.28 7.2 5.4
BX0X06BR-N52 30.82 9.4 7
BY0X08BR-N52 63.02 15.2 16
RX054BR-N52 16.37 7 5.4

Conclusions and advice for real-world applications

Use a big factor of safety.  Use magnets that are much stronger than the barest minimum necessary to hold the sign.  If you were driving behind a magnetic sign in a brand new car, how secure would you want it to be?
Use strategies to increase friction, such as our mounting magnets with rubber covers.  Or, consider including some high-friction surface in your own design.
Consider the actual speed you expect to drive with a sign.  A sign for a town parade at 25 mph can successfully use much smaller magnets than one that might speed down the highway at 85 mph into a 35 mph headwind!
Please be careful!  Test your sign with some safety mechanism in place, like the ropes we used.  Test away from traffic or other vehicles.

Neodymium Applications: - Magnetic Bottle Opener

Magnetic Bottle Opener                  

Magnets & Beer: What could go wrong?

Quite a few of our customers have asked us how magnets can be used to catch falling bottle-caps under a bottle opener.  We figured it was about time to try this out for ourselves.
While we originally thought this might be a little bit of a magnet gimmick, the end result turns out to be quite fun, and maybe even a little useful.

The Basic Setup

To open the bottle, a regular, wall-mounted bottle opener is used.  There are a number of these products available.  Some are made of bent sheet-metal or stainless.  We like the tough, cast products.  We found a few called "Starr X” openers that seemed like the classic openers we were looking for.
The basic idea is to mount the opener to a wall or other vertical surface, and then have a strong magnet underneath it to catch the falling caps.  This lets you open the bottle one-handed and not worry about catching the cap.  Plus, it’s fun to play with!
A typical setup places the strong magnet behind some surface so that the magnet is hidden.  While we constructed ours from wood, we’ve also seen solutions that use non-magnetic stainless steel or other non-magnetic materials.

What size magnet should be used?

The right magnet depends on a number of factors.  How strong should it be?  Does it need to hold just a few caps, or many?  Larger magnets obviously will hold more caps, though super strong magnets might make it difficult to remove all the caps by hand!  We figured a good goal is 24 bottle caps held by the magnet.
Also important is the distance between the magnet and the bottle caps.  This distance should be kept as small as possible to maximize the strength.  It is probably not a good idea to try this with ¼” or 1/2” thick surfaces.
We discussed the importance of keeping this non-magnetic layer thin back when we made a Magnetic Knife Holder.

Initial Testing

For a quick and dirty test, we figured we would try some of our Plastic Coated Magnets beneath an opener.  For an opener already mounted to a garage workbench, this might be a great, non-nonsense solution.
We tested each of these magnets underneath an opener, and counted how many caps it could hold:
Magnet Number of Caps
RX034DCSPC-BLK 1” diameter ring magnet 10
RX436DCSPC-BLK 1-1/4” diameter ring magnet 22-24
BX8C6DCSPC-BLK 1-1/2” x ¾” x 3/8” thick block 18-24
BY0X08DCSPC-BLK 2” x 1” x ½” thick block 24+ (35-40)


Testing with Magnets Behind a Thin Layer of Wood

We prototyped this by taping magnets behind a thin sheet of wood.  The wood was 0.065” thick, just over 1/16”.  We would not recommend using anything much thicker than this.
Magnet Number of Caps
D82 ½” diameter x 1/8” thick disc 1 too weak
D84 ½” diameter x ¼” thick disc 2-4 too weak
DC4 ¾” diameter x ¼” thick disc 10
DC6 ¾” diameter x 3/8” thick disc 11
DX08 1” diameter x ½” thick disc 24+ (30)
DX48 1-1/4” diameter x ½” thick disc 24+
DX88 1-1/2” diameter x ½” thick disc 24+ (40) too strong
BX8C8 1-1/2” x 3/4” x ½” thick block 24+
BY0X04 2” x 1” x ¼” thick block 24+ (30-40), one of our favorites
BY0X08 2” x 1” x ½” thick block 24+ (48), strong!
Series of four BX084 1” x ½” x ¼” thick blocks,
arranged with alternating polarity
Only 4-6. Not recommended.
If you are mesmerized by falling bottle caps snapping to a magnet, here is a really long video (8:51) showing a bunch of our testing.  It's a little repetitive, but by trying a number of different magnet sizes we were able to find the results we wanted.

Our finished solution

Rear and front views of two magnetic bottle openers.
We made a nice solution on the left using a strong, BY0X08, 2” x 1” x ½” thick magnet.  The strength of this magnet alone is enough to hold it in place on a refrigerator door.  We did use two small pieces of grippy tape stuck to the back of the wood (not double-sided), which increased the friction enough to prevent it from sliding around.
The opener on the right used two DX08 magnets, both with the same pole facing outward.  It also used four RC22CS-N magnets at the corners for a secure hold to the fridge door.  This is really strong, even a little difficult to remove from the door!
While the opener made with the darker wood uses the larger BY0X08 magnet, we really like the results even using smaller BY0X04 magnets.  Cleaning off the caps one time per case of drinks seems reasonable to us.
Here's a video of these openers in action.  Cheers!


iPhone Magnetic Measurements

iPhone Magnetic Measurements

Modern smartphones have internal magnetic sensors that can detect magnetic fields.  Learn more about how the output of these sensors can be useful in finding north, identifying the direction of the earths’ magnetic field, identifying poles of magnets and checking compliance with air shipment regulations. Neodymium Magnets

Detect Earth’s Magnetic Field

In our earlier article, The Earth is a Magnet, we described the earth’s magnetic field.  As most of us know, we can measure the direction of this field with a compass to figure out which way is north.  Most smartphones come preloaded with a compass application that does exactly that.
While most folks aren’t using this compass to figure out which way to go, they are using magnetic information indirectly.  When using an iPhone for directions, the phone considers not only the GPS sensor data, but also the magnetometer and accelerometers.  That’s part of how it can tell which direction you are pointed in.
The magnetic field sensed by the internal compass is not actually pointing to the north pole.  In fact, unless you live near the equator, it is probably pointing mostly down into the ground!
Here at K&J Magnetics in Pennsylvania, USA, the magnetic field points north, but also in a downward direction.  It’s angled about 67 degrees down!  That means it’s pointing down much more than it is pointing north.
There are a few applications that work well to detect the earth’s 3-dimensional magnetic field.  We demonstrate a few in the video below.

What is the strength and direction of the magnetic field where I live?

Intensity

Declination
Inclination
Curious about the strength and direction of the magnetic field near you?  Consider the 3 globes at right.
  1. Intensity is the overall strength of the magnetic field.
  2. Declination is how far off from true north you would expect a compass to point, where true north points straight to the earth’s north pole (the top of the globe, where it rotates).
  3. Inclination is how much the field direction is pointing up (into the sky) or down (into the ground).  Up is denoted as positive numbers, while down is negative.
For a better view of these maps, with spinning globes and more explanation of these terms, check out our page dedicated to Earth's Magnetic Field.

Detect a Magnet’s Magnetic Field

You can also use the same apps to measure the magnetic field near a neodymium magnet.  You can’t measure very strong magnetic fields very close to the phone – the sensor isn’t able to measure fields that strong.  Plus, you want to be careful not to get too close to the phone, or it could magnetize parts in it and/or mess up the compass calibration.

Identify a Magnet’s Poles

These applications can also help identify the poles of your magnet.  Below, we demonstrate how to use a few of these apps to identify the poles on an iPhone 5.
Don’t get a magnet too close to the phone, or it can temporarily mess up the calibration of the compass.

Estimate if a shipment meets air shipment requirements

In our article about Shipping Magnets, we describe the air shipment regulations pertaining to shipping magnets via air.  We also described a few ways of how to estimate it, though the surest way is to actually measure it with a special, very sensitive magnetic instrument.  Even though the sensors inside a smartphone are not sensitive enough to measure this directly, we can use them to estimate whether a package might meet these requirements.
If you can measure a magnetic field of 2 milligauss or more (0.002 gauss or 0.2 microTesla) at a distance of 7 feet from your package, the IATA (International Air Transport Association) says it must be labeled as a Dangerous Good.  We typically try to package magnets to be below this limit, avoiding the necessity of shipping as a Dangerous Good.  Can we measure this weak magnetic field with an iPhone?
Unfortunately, no.  The tiny measurement is beyond the resolution that the sensor is capable of.
However, if we place the smartphone at some closer distance, we might be able to infer the field strength farther away.  Considering how the field strength drops off near a disc magnet (formula found in Surface Fields 101), we figure that a magnet that has a 2 milligauss (0.2 μT) at 7 feet should have a strength of 20 milligauss (2 μT) at about 39 inches away.  This, the sensors can detect.
We are assuming that your package of magnets will have a magnetic field that drops off in this way.  It’s not perfectly accurate in every situation, but it’s a fair approximation.
In the video below, we measure the field strength of a few magnets in a few different configurations, both below and above the limit.  The output of the iPhone at 39 inches away, and an air shipment milligauss meter at 7 feet is shown.

From the theory and experimentation described above, we found that using the iPhone this way provides a decent estimate of whether or not a box of magnets would pass this air shipment requirement.  Measure the field strength without a magnet neaby, and then measure the change when you introduce the magnet at 39" away from the phone.  If your shipment shows less than a 2 μT change with the phone at 39” away from the box, it will probably be less than 2 milligauss at 7 feet away.
DISCLAIMER: Using a smartphone like this is only an estimate.  It is a great way to get a rough idea of how close you are, but might not be exact in all cases.  If in doubt, check with a calibrated air shipment milligauss meter.

CAUTION: Messing with powerful magnets near your iPhone can alter the calibration of the sensor!

In researching this article, we experimented with a number of powerful magnets near the phone.  While the compass can re-calibrate itself, it is possible to mess it up.  In our case, it seems that we might have slightly magnetized some component inside the phone.
While the compass still seems to work reasonably well, it doesn’t show the same overall field strength when we twist the phone around in different directions.  This relatively new iPhone did agree with itself before we starting experimenting.  There are a number of stainless steel shields inside an iPhone that might have been very slightly magnetized by the passing magnets.  Hopefully they will demagnetize over time.
Avoid getting powerful magnets too close to your smartphone, or risk messing with your own compass calibration.  Anything closer than a few inches is stronger than that sensor can measure anyway.

Temperature and Neodymium Magnets

How Hot is Too Hot?

What is the maximum allowable temperature of a neodymium magnet?  What happens if a magnet goes above this temperature?  How do I read a Demagnetization Curve?  Temperature issues and neodymium magnets can be a complex subject.  In this article, we'll try and simplify some of these concepts, and answer a few common questions.

The Basics

On our Specs page, two key temperatures are listed: the Maximum Operating Temperature, and the Curie Temperature.
Curie Temperature is the temperature at which all magnetization of the magnet is lost.
Maximum Operating Temperature (abbreviated to MaxOpTemp hereafter) is a general number given for each different grade of magnet material.  While not exact, it's a good guideline which applies to many situations.  In between the MaxOpTemp and the Curie Temperature, some percentage of the magnetization is irreversibly lost.
For many situations, this is enough information to work with.  If your eyes glaze over reading some of the technical information below, don't worry.  You can stop right here and be OK for many applications.

Some Definitions:

Magnetic Strength: Throughout this article, magnetic strength is the key measure.  The product of B times H is often used to described the strength of neodymium magnets.  For example, grade N42 magnets have a maximum BH (called BHmax) of 42MGOe.  This number directly relates to Pull Force Case 1, the attractive force from a single magnet stuck to a large steel plate.  You could also express this as magnetic field, measured in Gauss, at some specific location.  We specify Surface Field in Gauss, measured at the surface of the magnet.  Magnetic Strength is not power, or work, and cannot be expressed in terms of power.
Reversible losses: Up to the MaxOpTemp, you will see some loss of magnetic strength at those elevated temperatures.  When you bring the magnet back down to room temperature, it returns to the original strength.  These losses are small, typically within 5 to 10 percent.
Irreversible losses: Above the MaxOpTemp, some magnetization is lost.  When you bring the magnet back down to room temperature, it will be weaker than it was before the heating process.  A magnet that has had irreversible losses could theoretically be re-magnetized to the original strength, or very close to it.  (K&J Magnetics does not offer re-magnetization services for demagnetized magnets.)
Permanent losses: Above temperatures where the magnet material was originally sintered, structural changes will occur to permanently demagnetize a magnet.  No amount of externally applied magnetic field will bring the magnet's strength back.  For neodymium magnets, this temperature is very high, typically above 900°C to 1000°C.

How much strength will I lose at a given temperature?

We have to dig a little deeper to answer this level of magnet-geek question.  Let's start by getting a better estimate for MaxOpTemp.  The MaxOpTemp of a given magnet will depend largely on how it is used, "in circuit."  For a magnet in free space, this means it depends on the shape of the magnet.
Yes, that's right, MaxOpTemp depends on the shape of the magnet.  That's a hard concept to swallow, especially when we're used to thinking of operating temperatures as a material property.  Water boils at 100°C whether it's in a tall glass or a wide bowl.  Magnets, however, are not that simple.
The measure of this shape is called the Permeance Coefficient.  It's also sometimes called BH, the operating slope, or the load line.  You can find the Permeance Coefficient for any size/shape neodymium magnet in free space using our Magnet Calculator.  Generally, it is a larger number for tall, narrow magnets, and a smaller number for thin, wide magnets.

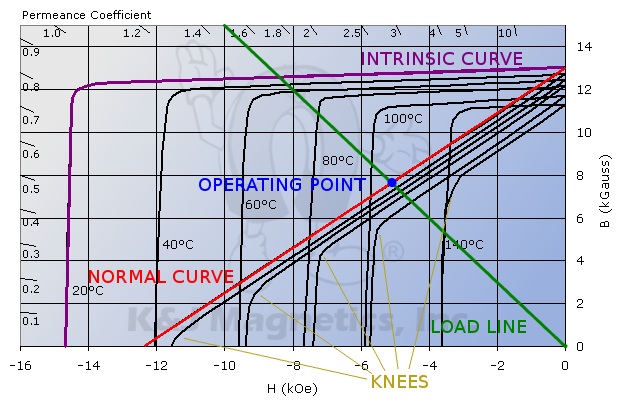
Demagnetization Curves/ BH Curves

You can find graphs of BH Curves for most of our common magnet grades here.  Let's define a few of the interesting features of these curves shown in Figure 1.
Figure 1: BH Curves for N42 magnets
Normal Curve: This curve describes the magnet's performance.  Use the curve for the desired operating temperature.  It's the curve most referred to for design purposes.  The linear portion of this curve has a slope that's sometimes called the Recoil Permeability.  For neodymium magnets, this slope is usually 1.05.
The Knee: The part of the Normal Curve where it bends down, becoming a vertical line.
Intrinsic Curve: The intrinsic curve can be derived from the normal curve, and vice versa.  Don't worry about this curve for now.
Load Line: A line from the origin, with a slope equal to the Permeance Coefficient of the magnet in circuit.  It's also called the Operating Line.  Draw this line from zero to the Permeance Coefficient of your magnet shown around the edges of the graph.
Operating point: The intersection of the Load Line and the Normal Curve describes the single operating point of a magnet.


Example # 1 - A D82 in Free Space

Let's walk through a few examples to illustrate how to use these charts, and what it all means.  Example # 1 is our 1/2" diameter x 1/8" thick, Grade N42, D82 magnet in free space.  Refer to the the N42 BH Curve for this magnet.  From the Magnet Calculator, I find that Pc, the Permeance Coefficient, is 0.61.  Draw a line from the origin (0,0), out to Pc = 0.61.  This is your load line.
With the load line shown in green below, you can find the operating point of this magnet.  At 20°C, it's at the blue dot, where the load line intersects the normal curve.  At 80°C, the operating point would be right at the knee of the normal curve.  Therefore, 80°C is the MaxOpTemp.

Figure 2: D82 Magnet at 20C


Above 80°C, the magnet begins to irreversibly demagnetize.  Let's consider a magnet that's gone up to 100°C -- dropped in boiling water.  The operating point shown as a blue dot below is at the intersection of the green load line, and the 100°C normal curve.  It is below the knee of the normal curve.  The operating point has dropped down by a distance shown as "B" in the Figure 3 below.
When you cool this magnet back to room temperature, it won't climb back up the knee.  It will drop by an amount shown graphically in purple, as "A".  The red dot represents the new operating point once the magnet cools back to 20°C.  The new operating point is dropped from the 20°C normal curve by the amount lost when the magnet went up to 100°C.;
Figure 3: D82 at 100C
What does this new operating point mean?  How much pull strength will be lost?  Consider that pull strength is closely related to the product of B times H.  Use the absolute value, and ignore the negative values of H.  Graphically estimating B * H from the blue dot in Figure 2, it is approximately 38.6 MGOe.  Doing the same for the red dot in Figure 3, I find about 26.3 MGOe.  So, the strength will have dropped to roughly 26.3 / 38.6 or to about 60% of the original strength.

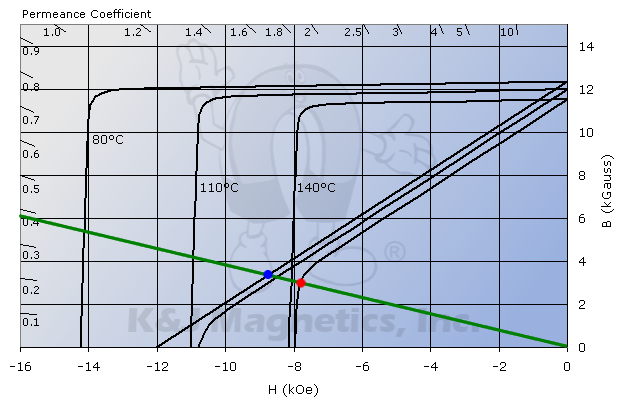
Example # 2 - A D44 in Free Space

Let's consider an example with a higher value for the Permeance Coefficient.  Any cylinder whose diameter is equal to it's height, like a 1/4" D44, will have a Pc = 3.46.  Again, you can find this value using our Magnet Calculator.
Below, the load line is again shown in green.  At 20°C, the operating point is shown in blue.  At 140°C, the operating point is shown in red.  It is interesting that we're using a regular N42 grade magnet, but not showing any losses due to temperature until it's over 140°C.
Figure 4: D44 BH Curves

Example # 3 - A D61 in Free Space

For our final example, let's consider a very thin magnet.  A D61 is a 3/8" diameter x 1/16" tall magnet.  This size is also available in the higher temperature grade N42SH, as a D61SH.  The Calculator indicates that the Pc value for this magnet is 0.38 in free space.  Again, the load line is shown below in green.
The operating point at 60°C is shown in blue.  At this temperature, we're still on the linear portion of the normal curve, so no loss of strength is expected.  At 80°C, the operating point is shown in red.  This is below the knee of the curve, so some amount of irreversible loss of strength is expected.  This result illustrates a handy rule of thumb: The MaxOpTemp may be lower for very thin magnets.
Figure 5: D61 BH Curves


If you need better temperature performance in this shape, consider the D61SH.  On our Specs page, N42SH magnets are listed as having a MaxOpTemp of  302°F (150°C).  Checking the N42SH BH Curves below, we find that the magnet performs without any losses at 80°C or even 110°C.  At 140°C, at the operating point shown at the red dot, we just start to see the first loss of strength.  The D61SH is clearly a better performer at high temperatures than the D61.
Figure 6: D61SH BH Curves


Final Notes

All these examples looked at disc/cylinder magnets.  Everything above is also true for other shapes.  The Magnet Calculator provides Pc values for Blocks and Rings too.
In all these examples, it was assumed that the Permeance Coefficient for a single magnet in free space was applicable.  In your application, this may not be true.  If the magnet is stuck to a big steel plate, it could be slightly less.  If it is stuck to another magnet, can be substantially more.  It does depend on your specific application.  All this theory is a great guideline, but be sure to test in your own situation.
How cold can neodymium magnets get?  Generally, the colder they get, the stronger they are.  We have yet to find the low temperature that hurts them.  Temperatures as low as -40°C to -60°C don't pose a problem.
What about temperature cycling?  This is a popular question.  As long as you're staying below the Maximum Operating Temperature, it doesn't matter how many times you cycle the magnet's temp.  No irreversible losses occur until you get above the MaxOpTemp.  Even then, if you lose some strength because the magnet strayed above that temperature, you wouldn't incur any successive losses by repeatedly going up to that same temperature.
What about N52?  If you compare the N52 curves to the more common N42, you'll see that there are trade-offs when you choose the most powerful magnet grade available.  In some cases, especially with thinner magnets, N52 magnets can have lower MaxOpTemps than N42.  Be sure to consider this in your selection process.

UPDATE: Low Temperature Information Added!

What about neodymium magnet performance at very low temperatures?  How about cyrogenic temperatures?
The graph at right shows measurement data of one magnet's Surface Field at very low temperatures.  If you start at room temperature (20°C) and get colder, the strength of the magnet increases by a small amount.  Below about -125°C, the strength then drops much more quickly.
Still, even at temperatures near absolute zero, there is still a good deal of magnetic strength left.  Even at the boiling point of liquid nitrogen, -196°C, there's still roughly 87% of the field strength you would find at room temperature.
Neodymium magnets are certainly usable at these low temperatures, but the loss in strength below -150°C should be planned for.  In most cases, the strength should return to normal once the magnet is brought back up to room temperature.

Why does this happen?  Neodymium magnets have a preferred magnetization direction. At these very cold temperatures, something happens in the structure of the molecules in the magnets, which temporarily changes the preferred direction by as much as a 30 degree angle.  This change is what reduces the strength.  When heated back up, the orientation returns to the original direction.